Blog
Hey Teachers! How do YOU use Google Suite?

The technology revolution in education feels like a rat race- and one which was just accelerated by Artificial Intelligence. But like it or not, unless you are counting double-digit days to retirement, it’s our responsibility to ride the wave of change, not be swept away by it. Plus, once in a while, we find a gem that transforms our teaching and learning experience. This blog will uncover the tricks I learned from teachers who use Google’s education suite (Docs, Sheets, Slides and Forms). As the Director of Curriculum Development at The Teacher’s Academy, I am constantly seeking new tools—be they tricks, hacks, free software, templates, or skills—to keep my teaching innovative and, on occasion, to impress my students and colleagues! I sincerely hope you can find one of these Google Suite for teachers hacks to be a true gem in your classroom.
Below is our list of the best features of Google’s Education Suite, curated by teachers, for teachers!
Google Docs
Recover Version History- Have you ever said the following to your students? “When I was your age, if we didn’t hit ‘save,’ we lost everything.” If you are a teacher over 30, you probably remember the moment when you lost everything! Thank you, Google, for taking our work to the proverbial “cloud” and featuring the first ever- autosave! Old habits die hard and occasionally, I don’t love the autosave. Sometimes, I want the original version and the undo button doesn’t take me back as far. Turns out, you can recover old versions in Google! Just go to File > Version history > See version history. Who knew!?
Create substitutions as you type- If you are ever typing a document that repeats the same phrase (think lesson plans and the phrase, “Students will be able to…”), why not simplify things and use the substitutions feature in Google Docs? It’s pretty simple, follow these steps:
- Click Tools in the top menu bar.
- Select Preferences from the dropdown menu.
- In the Preferences window, make sure you’re on the “Substitutions” tab.
- You’ll see a table with two columns:
- “Replace” (swbat)
- “With” (Students will be able to…)
In your document, begin typing swbat and press Enter to see the full substitution.
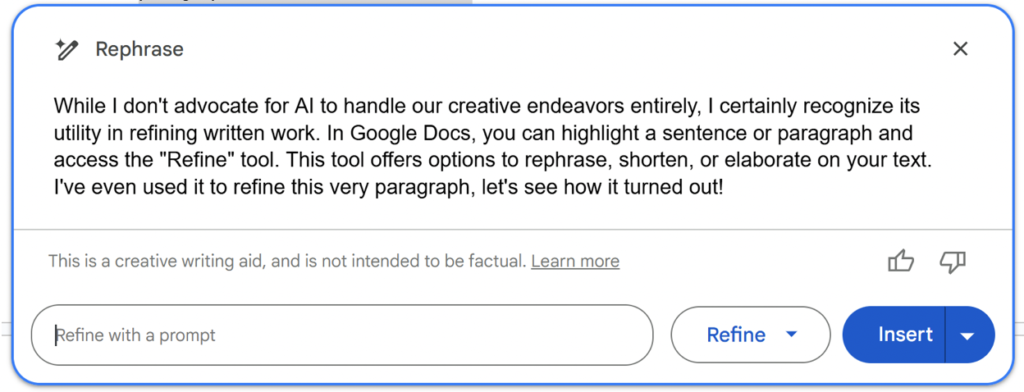
Use AI to Refine your Writing- I’m not a huge proponent of Artificial Intelligence doing creative thinking for us, but I can definitely see the value in its ability to refine my writing. After typing a sentence or paragraph in Google Docs, highlight it to see the Refine tool. Click it to see how you can rephrase, shorten or elaborate your text. I used it to refine this paragraph! Let’s see how it does… hmmm… not bad.
Google Sheets
1. Freeze Rows and Columns
I find it funny that students and teachers tend to avoid spreadsheet software. Microsoft Excel and Google Sheets are incredible tools for organizing, analyzing and manipulating data. From tracking book inventories to uniforms, attendance, participation, permission slips, feedback surveys (from Forms) and so much more, Google Sheets is my go-to program for all things data-driven! My first and favorite trick I learned was to keep the headers and first column visible as you scroll through many records. It’s called, freezing panes and it’s simple to do! In Sheets, click View > Freeze. Select 1 row to freeze your top header, or 1 column to freeze student names. You can freeze more than one row or column too.
2. Create a Drop-Down Menu
Perfect for tracking behavior, assignments, or participation with quick-click options like “Completed,” “Late,” “Missing.” Follow these steps to insert drop down menu options in your spreadsheet.
- Click the cell or column where you want the dropdown.
- Go to Data > Data validation.
- Under Criteria, choose Drop-down.
- Type in your list items (e.g., Completed, Late, Missing).
- Click Done.
Tip: Color-code options using Conditional Formatting (see below!).
3. Use Conditional Formatting to Color-Code
This tool is ideal for heat maps, behavior tracking, or visual grade trends.Let’s say you have a word (like “late”), or date that you want to show up as a different color so that it grabs your attention. There is a feature in Google Sheets that makes it visually easy to scan who turned in work, needs help, or is excelling. Here’s how to get your cells to change color based on a certain condition.
- Highlight the cells you want to format.
- Click Format > Conditional formatting.
- Choose your rule (e.g., “Text contains ‘Late'”).
- Pick a text or background color.
- Click Done.
4. Add Check-boxes
This is simple but probably most used by mel! I use it for attendance, homework check-ins, tracking permission slip, and even my own grocery list! Highlight the cells where you want checkboxes. Go to Insert > Checkbox. Click to check and uncheck! It’s that simple!!
5. Use the =SPLIT Function to separate names
This might be the most advanced feature I’m sharing today. If you are ever importing student names from a roster and both names import into one column, you might want to split the names into two columns: First and Last names. I use this feature whenever I import student names from my online grading system to get them into ZipGrade. There might be other reasons to split data in a cell, so here’s a quick how to that will split the cell in seconds.
- Click on a blank column next to your data. (Or insert a blank column next to the data).
- Type: =SPLIT(A2, ” “) (replace A2 with your cell)
- Hit Enter. First and last names will split into separate cells.

Google Slides
1. Embed YouTube Videos
Not only will embedding videos keep your Slides presentation focused (no YouTube rabbit holes!), but the teacher’s tools on YouTube are endless! I use this to embed timers, meditations or even background music. The key is in the formatting. Some videos we want to start right away, and some should begin on a click. Read below on how to get this feature in your Google Slides presentation.
- Click Insert > Video.
- Search or paste a YouTube link.
- Resize and reposition the video on your slide. You can even crop the video to show just the screen!
*Note- in some cases you may not want the video to be visible on the slide (background music). You can resize the video to be small and position it so that only a small fraction of the video remains on the slide. As long as any part of the video is on the slide, it will play!
- In Format options, choose to autoplay, mute, or start at a specific time.
2. Table of Contents
Creating internal slide navigation like a table of contents allows the student to control the learning experience. I recommend mapping the presentation beforehand so you can plan which slides will be “landing slides” and which will be “home” slides. In our course,
- Click on the object or text you want to hyperlink.
- Press Ctrl + K (or Cmd + K on Mac) or click the link icon.
- Click “Slides in this presentation”.
- Choose the slide you want it to jump to.
3. Use Google Slides as your design platform
For some reason, Canva is difficult for me to manipulate. I am more comfortable with the slide format and tools, so once I know the size of the product, I prefer this platform. Here’s how to set up Google Slides to be the layout you want for print designs. It’s also a great option for students who need a comfortable place to design posters and other infographics.
- Go to File > Page setup.
- Choose Custom and enter dimensions (e.g., 8.5 x 11 for a flyer or worksheet).
- Add text boxes, images, shapes, and student content.
Google Forms
This might be the most underrated Google Suite for teachers tools (after Sheets!). I use it daily as an exit ticket, annually as an end of the year feedback survey and all the time in between as a quizzes, behavioral charts, formative checks and more.
1. Create Exit Tickets in Under a Minute
This instant reflection tool changed how I teach. You can collect exit info on every lesson with just ONE form! Here’s how:
Use simple form questions like:
- Daily topic:
- What did you learn today?
- What’s one question you still have?
- Rate your understanding from 1–5.
- Collect responses using a QR Code popped into your daily presentations. It’s that simple!
2. Turn a Form into a Self-Grading Quiz
If you started creating a form, but decided you would like it to have a “graded” feature like a quiz, you can! Quizzes are self-grading and give students instant feedback. It’s simple to make this switch!
- Click the settings icon. Go to the “Quizzes” tab
- Toggle on “Make this a quiz”
- Assign answer keys and point values.
3. Use Branching for Choose-Your-Own-Adventure
I love making these scavenger hunts. They are ideal for differentiated learning, review or digital story telling. Even better, I love asking the students to make them. The creative process can be complicated and require some critical thinking, but the results are so rewarding! To get a more detailed process on building one of these forms, check out the course, Google Forms for Educators where you can earn 15 hours of professional development while uncovering all that Google Forms can do! For an abridged version, try these steps:
- After typing a multiple choice question in Google Forms, use “Go to section based on answer” to direct students to different questions or outcomes depending on their response.
TIP: It helps to map out the possible journeys before embarking on this project!
Additional Resources
There are lots of tips for using Google in the classroom. Here are a few curated from reputable education sources:
Edutopia: Easy to Use Supports for Students in Google Workspace
YouTube: How to Use Google Classroom for Beginners
Google Classroom: Explore All the Tools Google has to Offer Teachers
Wrapping Up
The Google Suite for teachers offers an incredible array of tools that can truly revolutionize the classroom experience for both teachers and students. From streamlining everyday tasks to creating engaging presentations and dynamic assessments, these features are designed to empower educators. We hope these tips and tricks serve as valuable gems in your teaching journey.

For a more detailed guide to these skills and to earn hours for professional development, you may take these courses at TheTeachersAcademy.com.
The Teacher’s Academy is proud to be the number one provider for professional development for teachers. Accredited and trusted, we are committed to equipping you with the skills and knowledge to navigate the ever-evolving landscape of education and truly ride the wave of change.